
 It’s a bit like Bigfoot. Some have said they’ve seen it, and can suggest how it might work. Some think it will never eventuate the way we want. And Apple has had this capability for years!
There are some technical challenges from a Windows/x86/x64 perspective, but I would have thought it would be easier. My last couple of posts have been talking about building a Windows Deployment Server in your network, and while I was building this out it really made me look at the possibility of making this available over the Internet. I spent days trawling through Windows docs and lots of other pages trying to find a way to embed a VPN client into my WinPE Boot Image, but the answer was surprisingly MUCH simpler than that.
I’ve been sitting on this for a while and its been pretty exciting to get this working.
If you want to know how to deploy a customised Windows 10 image to your staff, over the Internet, and have it automatically enroll into Workspace ONE read on.
This is a follow on from Part 1 – Installing a Windows Deployment Server
This is a follow on from Part 2 – Creating, Capturing and Deploying a Customissed Windows Reference Image
Windows Deployment Services and anything similar/related to deploying Windows all rely on Windows File Shares. Over the network its using the SMB protocol, which technically could be exposed over the internet but theres no way I’m game to open that up even on my homelab!
Hence me looking at a VPN.
That wasn’t a successful exercise either, but on a hunch I thought for sure there must be a web based service that allows SMB access. You know what? Azure does!
To set this up, in my Azure Admin Portal I created a Storage Account. This enabled me to host some files in Azure. Next, Azure has a new service called ‘Serverless SMB File Shares’ that allows you to access files in your storage account remotely and enabling authentication on them that is different to your On-Prem Active Directory.
Let’s look how I was able to make my Windows Deployment Server Environment to deploy an image from Azure for a few dollars!
Firstly, log in to your Azure Portal at https://portal.azure.com and once you’re in there create a new Resource Group.

You’ll need to give it a name as well as a location – pick the closest to you and your users for speed.

Create the Resource Group and then we need to add some resources (services) to it.
Go into your Resource Group and click Add.

This will bring up every kind of Resource you can create in Azure, so search for “Storage Account”, and you want the Green One (by Microsoft)

On the next page, select create and then wait until its complete. After this we need to give it some info.
Give it a unique name and Location (this will need to be the same as your Resource Group). The other defaults are fine.

To make this internet accessible, we need to make this a Public Endpoint.

And you can leave Advanced as the defaults.

Then create it, and wait until complete.
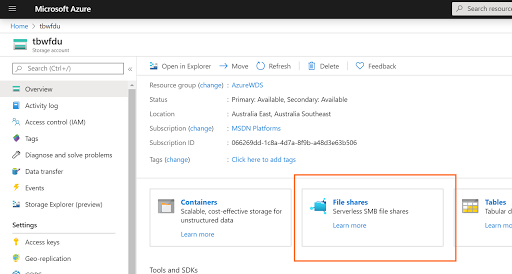
Once its done, go into the Resource and you’ll see an option for “Serverless SMB File Shares”
Click on this, you’ll see an option to create a New File Share, and then just give it a name and a quota. Make sure you allow at least 5GB for the boot files and the .WIM file.
Go into the File Share you created and then click on the Connect Button. This will give us the credentials we need to access this remotely.

Clicking Connect will open up a Window that gives us a Powershell Command that is meant to mount this share in Windows.

The important parts out of this command are:
ComputerName
User
Pass
This gives us everything we need to mount this share over the Internet.
Make a note of these details.
Now, go to your Windows Deployment Server and mount a Network Drive (or use the above command from Azure). We will soon need to upload some files here. You need to do this now otherwise the other steps will complain.
IMPORTANT: If you’re not going to use the Powershell commands and just want to map it using Windows Explorer, make sure you don’t include the ` and the ” from the username and the password fields etc.
Next, go into your Deployment Workbench MMC and we want to create a new Deployment Share.
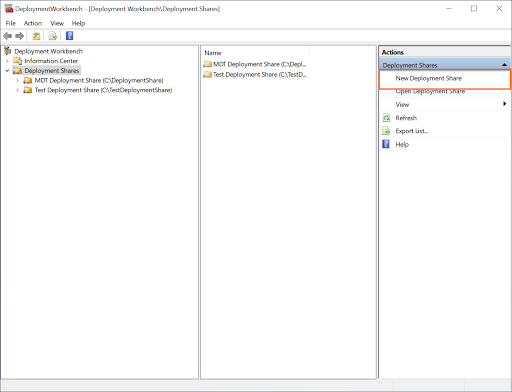
Give it a name and a new share path (we’ll change all this later) and select all the defaults.


Once its complete, right click on your new Deployment Share and go to Properties.
You need to edit the Network Path to the SMB Share you created on Azure. If you haven’t already mapped a network drive to this location (and saved credentials), you may get an error about the path not existing.

Under the Rules tab, delete all of the defaults and copy them from your other DeploymentShare (remember, this automates and skips some of the steps).
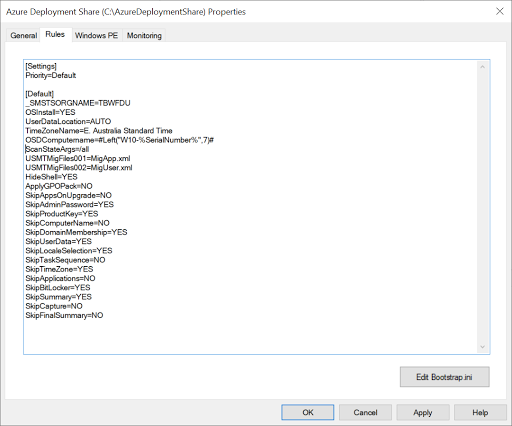
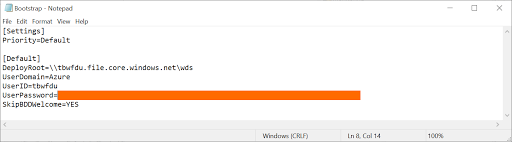
The last thing on this page we need to do is edit the Bootstrap.ini file.
Once again, you need to copy the settings from your other DeploymentShare but adjust it to match the file share from Azure
Now, right click on the Deployment Share in the Deployment Workbench and select “Update Share” and let it generate the new boot images.
Once its done, copy the Task Sequence and the Operating System from your other (default) Deployment Share into this new one. This was the Task Sequence and the Custom Captured OS WIM file we created in the previous articles.
You can do this inside the Deployment Workbench by simply right clicking, copying and pasting between the DeploymentShares.
Next, just open up the copied Task Sequence and make sure the Operating System Deployment task is pointing to the correct OS WIM File.

The last thing we need to do is copy your Microsoft Deployment Workbench files to the Azure share.
Copy all files and folders from your (new) Deployment Share (except the .Boot folder) to your mapped drive for Azure Files. If you have more than one Operating System in this share it could take a while.

Congratulations, you can now use the generated bootable .iso file (“C:YourDeploymentSharePathBootLiteTouchPE_x64.iso”) to boot your PC and install the image from Azure!

Now, understandably your users will need this on a bootable CD/DVD or a USB, but you could easily make this file available to them and direct them to make a bootable USB using many of the available tools on the Internet!
Personally I use BelenaEtcher or Rufus and even though directing the users to create a bootable USB is an extra step, its much easier than having to send the machine back to IT or wait until you’re back at work to repair it! I have plans to improve this process (UEFI HTTP Boot!) once I can find a Dell PC that supports HTTP boot in their BIOS!


Leave a Reply
You must be logged in to post a comment.