For my very first (technical) post I wanted to start with a bang.
As I mentioned in my introduction, I am Subject Matter Expert (herein and forever referred to as SME to save on typing) in VMware Identity Manager (vIDM) and all the things that come along with it. This along with my enjoyment of tinkering, integrating and playing with things, I talk about Identity and Authentication a lot with my customers and the one thing that keeps coming up a lot is how can they integrate vIDM with Azure Active Directory. Whether customers are actually using AAD or not is a different story, but it seems that everyone is at least looking at it.
I’m not going to get on my soapbox about how Azure Active Directory is not a replacement for Microsoft Active Directory Domain Services (yet), but I will outline the steps required below to integrate vIDM and Azure AD and allow users to authenticate with the AAD credentials.
Why do they want to do this? There could be a few reasons:
- They want to use Microsoft Risk Based/Conditional Access Policies.
- Their SaaS Applications are federated with Azure AD and don’t want to change this to vIDM.
- Because they can (just like I wanted to prove).
VMware Identity Manager is a great product and can do all kinds of things that Azure AD doesn’t, but I think it’s important to point out how we can use the best available for the customer’s requirements.
Anyway enough justification, in the steps below I’ll show you how to do it.
Adding Azure AD as a Third-Party IDP in Identity Manager
This is a straight forward process. In your Azure Portal you need to create an ‘Enterprise Application’ (your Identity Manager Tenant) and then add Azure AD as a third-party IDP in Identity Manager.
1. Login to your Azure Portal https://portal.azure.com and select Azure Active Directory.
2. Find ‘Enterprise Applications’ in the list under Manage and then ‘New Application’.

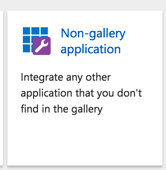
3. You need to select ‘Non-Gallery Application’ and give it a name and press Add.
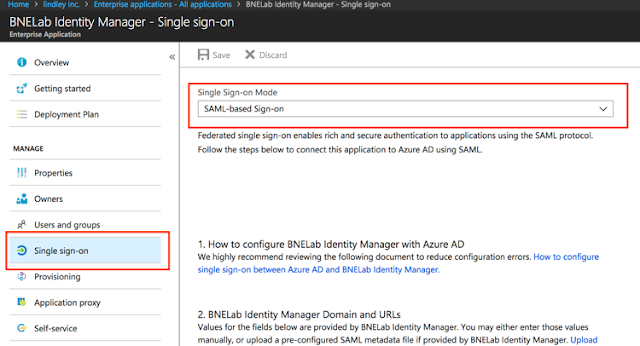
4. Select Single Sign-On and in the drop list, select ‘SAML-Based Sign-On’.
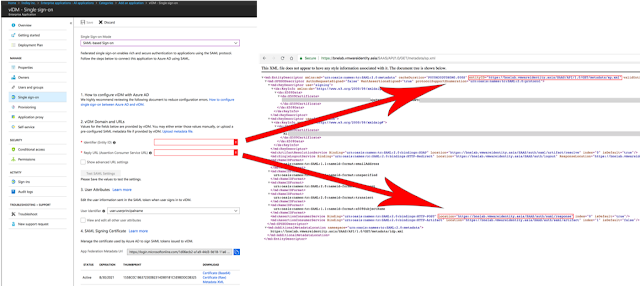
5. To get the required information, you need to get your SP metadata .xml file from your Identity Manager tenant.
Open https://[tenant].vmwareidentity.com/SAAS/API/1.0/GET/metadata/sp.xml in a web browser.
6. Configure the parameters in the Enterprise Application using the fields mapped from the sp.xml file
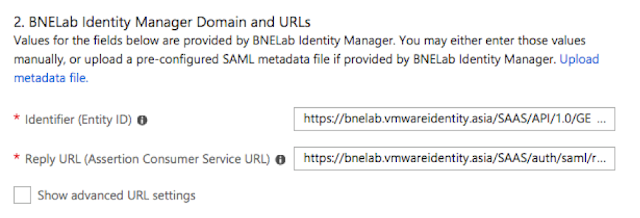
Identifier = EntityID Value from the .xml file
Reply URL = The POST Value from the Assertion Consumer Service in .xml
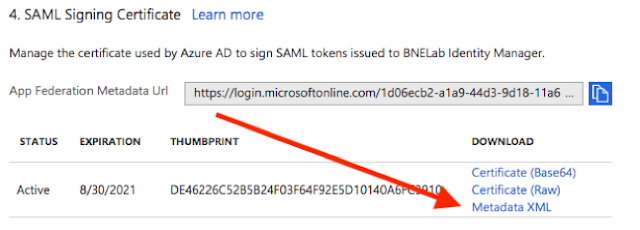
7. Next, download the Metadata XML file from the Azure Enterprise Application.
8. The last thing in the Azure Portal you need to do is assign it to some users. If you don’t assign this to your users no-one can authenticate. Go to Users and Groups and assign it to your Users.
9. In your Identity Manager Admin Console, go to Identity & Access Management, then Identity Providers and Add Identity Provider. Select Create Third Party IDP.

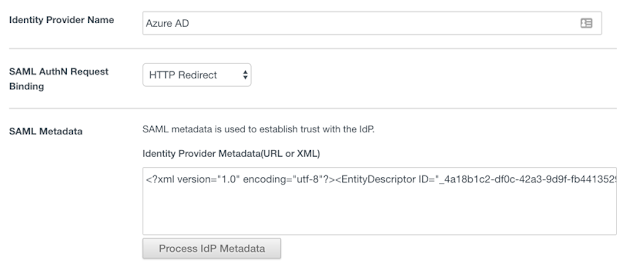
10. Give your IDP a name (eg. Azure AD) then paste the entire contents of the metadata.xml file that you downloaded from the Azure Portal and paste it into the SAML Metadata field. Then, press Process IdP Metadata.
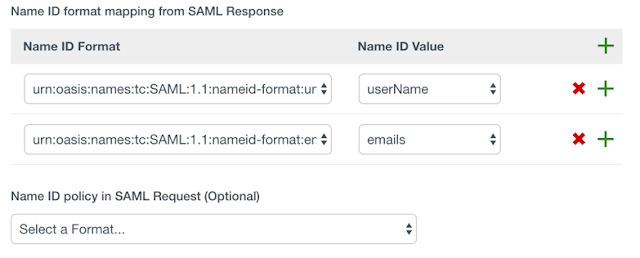
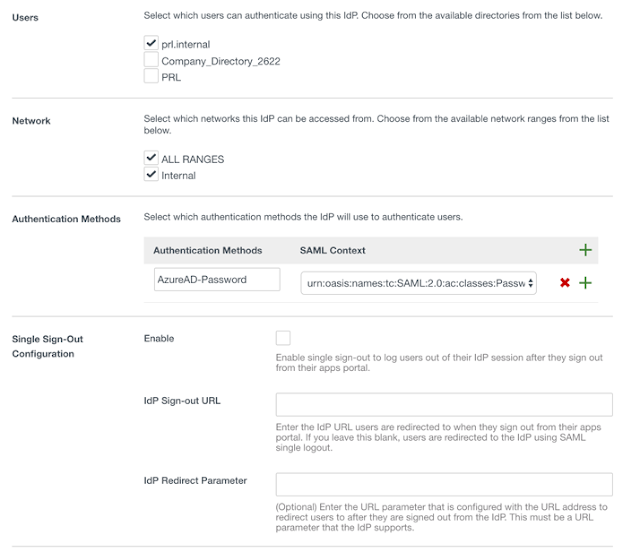
11. Under Name ID Format add two mappings:
- unspecified = userName
- emailaddress = emails
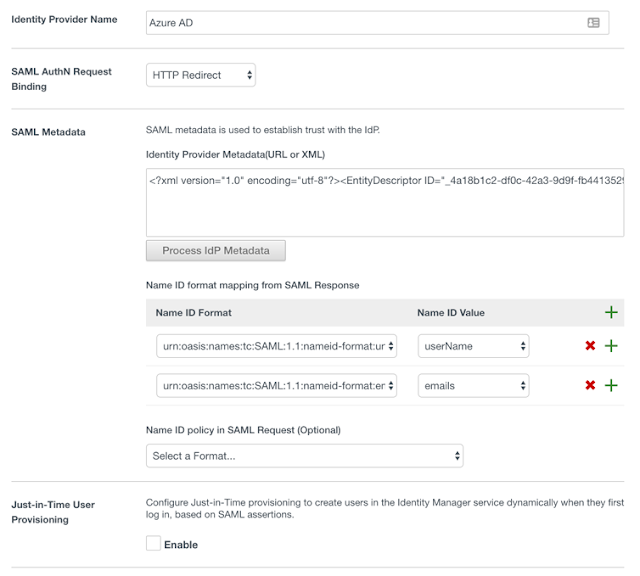
Make sure you assign your Directory to this IdP.
12. Add the Authentication Method “urn:oasis:names:tc:SAML:2.0:ac:classes:Password” from the dropdown and give it a name. This will display in Access Policies.

Now Press Add to complete the integration. The follow images show the entire configuration.
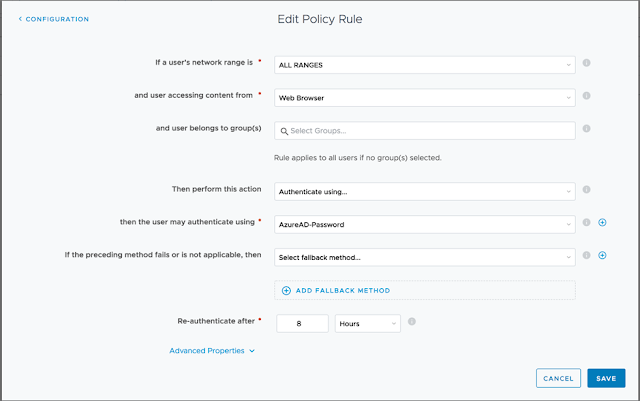
13. You now need to add this Authentication Method to your Access Policy. In this example we’ll add to the default_access_policy_set which means we’ll be redirected to Azure AD to authenticate to the Workspace ONE Portal. You could also add this to any of the added SaaS Applications as well.
To see what looks like in action, here’s a video of a Windows 10 PC logging into Identity Manager using Azure AD as the Identity Provider.


Leave a Reply
You must be logged in to post a comment.